Manual for the Zaunkoenig M3K
Overview
Out of the box your M3K runs with these settings:
- USB High-speed
- 8,000 hertz
- 2 mm LOD
- Angle snapping off
- 800 CPI
What follows is a quick overview of what the above mouse settings actually mean. After that we will describe how to change these values by either using the Zaunkoenfigurator (changing settings via the browser) or by using nuclear launch codes (changing settings via certain combinations of button presses).
Available mouse settings
USB speed
The M3K can be used with USB Full-speed (12 Mbps) or USB High-speed (480 Mbps). The difference between those two is that the highest driverless polling rate you can achieve with USB Full-speed is 1,000 hertz. With USB High-speed, however, the highest possible polling rate is 8,000 hertz. You can use your M3K at USB High-speed and then use a polling rate of just 1,000 hertz. This has the advantage that your clicks will be processed at 8,000 hertz, but your cursor stays at 1,000 hertz, which can improve the FPS you get in-game.
USB High-speed, however, is more prone to signal integrity issues in the cable, so should you have issues with disconnects give USB Full-speed a try.
If you want to double-check the polling rate of your M3K you can use this little website, made by «Bored». Move your M3K in quick circles but not in a zig-zag fashion. If you move your M3K quickly enough you should get a reading very close to 8,000 hertz (example: 7,942 hertz). Beware: If you are on a MacBook it is possible that the maximum hertz reading you will get is locked to the frame rate of your monitor.
If you want to analyze mouse input with more fidelity we recommend installing a software called «MouseTester», originally developed by microe1. These days there are several forks of MouseTester; we recommend giving this one by dobragab a try.
If you want to give MouseTester a try here are some pointers:
- Since a certain Windows update, only programs in the foreground get the full polling rate from your mouse, every program in the background will only get 125 hertz. So make sure you use MouseTester while it is in the foreground.
- The best way to generate mouse movement is by doing fast circles.
- Use interval/time for plotting as it actually shows the collected data instead of mathematical conversions.
If that was not technical enough for you, you can give this MouseTester guide by Japanese blogger piaKnow a try.
Polling rate
Controls how many times per second your mouse cursor updates. USB Full-speed only offers you 1,000 hertz, whereas USB High-speed gives you 1,000 as well as 2,000, 4,000 and 8,000 hertz. If you want to verify the polling rate of your M3K you can use this little website, made by «Bored». Move your M3K in quick circles but not in a zig-zag fashion. If you move your M3K quickly enough you should get a reading very close to 8,000 hertz (example: 7,942 hertz).
Lift-off distance
Lift-off distance (LOD): Lift-off distance sets how quickly the sensor stops tracking when you lift the M3K. Available settings: 1 mm, 2 mm and 3 mm.
Angle snapping
Angle snapping smooths out slightly crooked movements into perfectly straight lines. It will turn perfect circles into rounded squares as well, though.
Primary button
Primary button: You can create a left-handed version of your M3K by swapping the primary button in hardware. Meaning: pressing the physical left mouse button will trigger a right click (unless you are entering nuclear launch codes; in this case nothing is swapped). You might wonder why this setting even exists: games like League of Legends or Valorant ignore it if you swap your primary mouse button in the Windows control panel; and relying on third-party remapping software could trigger anti-cheat software.
Sensitivity
Sensitivity is measured in counts per inch (CPI). Doubling your CPI, for example, means that for the same physical movement of your M3K your cursor will move twice as many pixels on your screen. With the M3K and its PixArt 3399 sensor you can use 50 as the lowest and 20,000 as the highest CPI value; and every step in between, in increments of 50 CPI.
Zaunkoenfigurator
If your M3K has been shipped out in the second half of 2025 or later it will already have the firmware version you need for Zaunkoenfigurator installed. If not you need to update your firmware (scroll to the bottom of this page).
At the moment, the Zaunkoenfigurator is limited to the M3K and works only in Chromium-based browsers like Chrome, Edge or Brave. Firefox and Safari still seem unconvinced that talking to a mouse is a good idea.
Once you open zaunkoenig.co/zaunkoenfigurator, click the Connect button. Your browser will ask for permission to access the HID device. Select M3K (it will show as M3K – Paired on subsequent connections), click Connect in the bottom right corner, and grant the requested permissions.
For Linux users: On Linux the browser needs one additional
permission step. Create the file
/etc/udev/rules.d/71-zaunkoenig-webhid.rules with the
following content:
# Zaunkoenig M3K
KERNEL=="hidraw*", \
SUBSYSTEM=="hidraw", \
ATTRS{idVendor}=="0483", \
ATTRS{idProduct}=="a462", \
MODE="0666"

# Zaunkoenig DFU
ACTION!="remove", \
SUBSYSTEM=="usb", \
ATTRS{idVendor}=="0483", \
ATTRS{idProduct}=="df11", \
MODE="0666"
Then run:
sudo udevadm control --reload-rules && sudo udevadm triggerAfter that, unplug your M3K and plug it back in. The Zaunkoenfigurator should now be able to connect seamlessly.
Once connected, you will see the main interface with your model and firmware version at the top. Below that you can adjust the following six parameters:
- USB speed
- Polling rate
- Lift-off distance
- Angle snapping
- Primary button
- Sensitivity
Here is what it looks like:
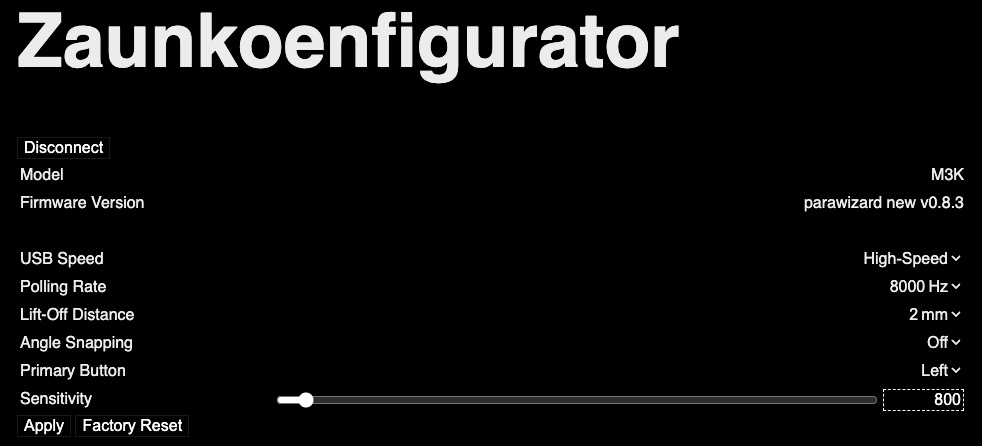
Settings are applied by clicking the «Apply» button. Clicking Factory Reset restores the following defaults: USB High-speed, 8,000 hertz polling rate, 2 mm lift-off distance (LOD), disabled angle snapping, and 800 CPI.
Nuclear launch codes
USB speed
You switch between USB Full-speed (maximum polling rate: 1,000 hertz) and USB High-speed (maximum polling rate: 8,000 hertz) by plugging in your M3K with the left and right mouse button held down; let go of the buttons after a second or two.
To indicate the change your cursor will do a figure one (USB Full-speed) and a figure eight (USB High-speed) respectively.
Polling rate
Hold your M3K up in the air, so the sensor cannot track, and hold down the left and right mouse button for 10 seconds. After 5 seconds your M3K will enter the CPI programming mode and tell you its current CPI; ignore that and keep holding down both buttons for 5 more seconds, until your M3K starts drawing clockwise squares and numbers on your screen (that means you have entered the LOD and polling rate programming mode; you can now let go of the buttons :P).
Here is how to interpret those numbers: a figure 8 stands for 8,000 hertz, a figure 1 for 1,000 hertz, a figure 2 for 2,000 hertz and a figure 4 for 4,000 hertz.
Put your M3K back on your mousepad to change the polling rate.
Clicking right increases your polling rate, unless you already are at 8,000 hertz, in which case clicking right would result in a new polling rate of 1,000 hertz. Your mouse cursor will draw the corresponding figure to each hertz value.
Each time you right click your cursor will draw a number, to show you the current polling rate.
Note that when you dumbed your M3K down to 1,000 hertz via USB Full-speed you will not be able to change the polling rate via the LOD and polling rate programming mode. You would first have to set your M3K back to 8,000 hertz via USB High-speed by plugging it in with the left and right mouse button held down.
You can exit LOD and polling rate programming mode by holding up your M3K and pressing down the left and right mouse button for 5 seconds. Upon exiting your M3K will again tell you its current LOD as well as polling rate.
Lift-off distance
Hold your M3K up in the air, so the sensor cannot track, and hold down the left and right mouse button for 10 seconds. After 5 seconds your M3K will enter the CPI programming mode and tell you its current CPI; ignore that and keep holding down both buttons for 5 more seconds, until your M3K starts drawing clockwise squares and numbers on your screen (that means you have entered the LOD and polling rate programming mode; you can now let go of the buttons :P).
Each square represents 1 millimeter of lift-off distance. If your cursor draws three squares the LOD of your M3K thus will be at 3 millimeters.
Put your M3K back on your mousepad to change LOD values.
Each time you click left the LOD will be increased by 1 millimeter and your mouse cursor will draw clockwise squares to show the new LOD. If the LOD is to 3 millimeters and you try to increase it one more time the LOD will jump down to 1 millimeter.
To exit the LOD programming mode hold your M3K up in the air. Upon exiting your M3K will tell you its current LOD (as well as polling rate).
Angle snapping
To activate angle snapping, hold down the left mouse button for at least 3 seconds while plugging in your M3K. The mouse cursor will move clockwise in a square to indicate the change. To disable Angle Snapping, repeat the same procedure; this time the cursor will do the square counterclockwise.
Primary button
Plug in your M3K with the left mouse button held down for at least five seconds. Your cursor will do a jump to the right and back again to indicate a succesful change.
Should you want to switch back repeat the above procedure; this time your cursor will jump to the left and back again.
CPI
- Plug in your M3K.
- Lift the M3K a few centimeters off your mousepad so it stops tracking.
- Hold down the left and right button for 5 seconds.
- The M3K now enters the so-called «CPI programming mode». Upon entering the mouse cursor will jump around to show you at what CPI the M3K is currently at. There are four kinds of jumps the M3K can do (that is four times as much than what a one-trick pony can do): up-down (indicating 10,000 CPI), right-left (indicating 1,000 CPI), down-up (indicating 100 CPI) as well as left-right (indicating 50 CPI). The default CPI value of the M3K is 800 CPI and would result in eight down-up jumps, for example.
- Now place your M3K back on your mousepad; you will not be able to change CPI while your M3K is up in the air.
- With your M3K on your mousepad you can now change the CPI by pressing either the left or right mouse button. Each time you press your left mouse button, the CPI decreases by 50 until you reach the minimum CPI value of 50. Pressing right increases CPI by 50. While you are doing this you can move the M3K around to get a feeling for different CPI values.
- If you want to increase CPI by 500 you can use the following shortcut: hold down the left mouse button and press right (vice versa for decreasing by 500 CPI). The mouse cursor makes a bigger jump to indicate an increase by 500 CPI instead of just 50 CPI.
- You exit the CPI programming mode the same way you entered it: Lift your M3K a few centimeters off your mousepad so it stops tracking and hold down the left and right mouse button for 5 seconds.
- Upon exiting your M3K again will tell the CPI it is currently running with.
Reset
Performing a reset on the M3K will restore the following default values: 800 CPI, angle snapping off, 2 millimeters LOD and a polling rate of 8,000 hertz.
And this is how you perform the reset: plug in your M3K with the right mouse button held down. Keep the right mouse button held down for at least 1 millisecond, but no longer than 3 seconds, to perform a reset. Upon a successful reset the mouse cursor will do a backslash (meaning: your mouse cursor will move diagonally towards the bottom right).
If you hold down the right mouse button for longer than 3 seconds your M3K will enter a mode called «Device Firmware Upgrade» (DFU). You know you accidentally got into the DFU mode when your mouse cursor is frozen. If that happens to you simply plug your M3K out and back in again.
Updating the M3K firmware
The following instructions will show you how to update the firmware in Windows as well as Linux.
Windows
Download the following five files here, here, here, here and here.
Included in those five files is a .bat file with the name of
update to parawizard new v0.8.4 signed driver.bat.
Execute it (run as administrator) and follow the on-screen
instructions.
Alternatively, if you want to test your pain tolerance, you can download a piece of software written by the maker of the M3K MCU; with it you can flash the actual firmware file (.bin) directly to the M3K. This software is called STM32CubeProgrammer and in order to download it you have give STM your email. Also you should avoid versions 2.16, 2.17 and 2.18, since they do not work reliably on every system. Known good versions are 2.14 and 2.15. It does not get better; good luck.
Linux
Updating in Linux is a bit simpler. Start by checking whether you have dfu-util installed. If not install it with this command:
sudo apt-get install dfu-utilNext: download the latest firmware bin here.
Now you need to put the M3K into DFU mode: hold down the right mouse button, then plug in the M3K but only let go of the right mouse button after at least 3 seconds have passed.
Now you are almost there: execute the following command:
dfu-util -a 0 -s 0x08008000 -D "parawizard new v0.8.4.bin"FCC
The Zaunkoenig M3K complies with 47 CFR Part 15. Our FCC partner in the US: Michelle Construction, 7575 Hillcrest Avenue Manitou Beach, Michigan, 49253, chuck@michelleconstruction.com