Nuclear launch codes
, by Patrick SchmalzriedFive years ago someone on Reddit described how he felt about increasing the sensitivity of his M1K:
«i have the stock DPI for the m1k cause man i really dont wanna enter launch codes on my mouse just to turn up the DPI.»
At the time, we did not reach out to this individual. He sounded like a cranky general with access to nuclear missiles. Best not to poke the bear, we thought. We did, however, adopt the term «nuclear launch codes» to describe our firmware approach.
Here is how these nuclear launch codes actually work in practice. Suppose you want to increase the CPI of your M3K by 100. First, lift the mouse so the sensor stops tracking. Press and hold both primary buttons for five seconds. Once the cursor jumps up and down eight times – indicating the 800 CPI default – you are in programming mode. Place the M3K back down and click the left button twice to add 100 CPI. Exit the same way you entered. Nine cursor jumps will confirm the new 900 CPI setting.
We are actually still quite fond of our nuclear launch codes. They grant you full control over your Zaunkoenig without forcing a software install on you (good luck doing that at a tournament) or cluttering the mouse with heavy, dedicated buttons. We prefer to keep things lean.
Over the years more and more people started complaining about our nuclear launch codes, though. They demanded web configuration software and pointed out how common that was in the keyboard world. At the same time, however, we were dealing with a long streak of serious production issues (evidenced by the fact that our last blog article was published two and a half years ago) and simply did not have the time to implement a firmware feature that merely improved convenience. A predicament.
The three pillars of Zaunkoenig firmware
In our 2019 blog article «The three pillars of Zaunkoenig firmware» we listed three core ideas that defined the firmware of our gaming mice:
- Self-sufficiency
- Open source
- Ultra-low latency
Self-sufficiency means you can fully set up our mice without any external tools – provided you know the nuclear launch codes.
Open source and ultra-low latency are self-explanatory. It is worth noting, however, how rare open-source firmware for a gaming mouse is. Seven years ago Zaunkoenig was the only gaming mouse company to have an open-source firmware. These days only one other company has joined us: Ploopy.
Open-source firmware
Why did we make our firmware open source in the first place?
Well, there are several reasons. Remember that cranky general from above? Imagine for a moment that he finally had enough of his M1K and decided to launch a nuke towards Stuttgart, Germany. This probably would be the end of Zaunkoenig. But thanks to open source, someone else could always pick up where we left off.
If you are the cynical type, you might argue that where there is one nuke, more will follow – and that humanity alongside our firmware will go up in smoke anyway. You would be wrong, though. The firmware for the Zaunkoenig M1K is part of the GitHub Arctic Code Vault, which means that somewhere in a decommissioned coal mine in the Svalbard archipelago (Norway), 250 meters below ground, the Zaunkoenig M1K firmware is stored in the form of a high-density QR code on an archival film made of silver halides on polyester. Should humanity be destroyed in an all-out nuclear war at least the firmware for the M1K will survive. So yeah, the joke is on you.

Making sure our firmware survives nuclear war is just one reason for going open source, though.
Reason number two: open-source firmware enables you to tweak your firmware any way you want.
It is the third reason, though, that is the big one; but I will let Linus Torvalds do the talking:
I often compare open source to science. Science took this whole notion of developing ideas in the open and improving on other peoples ideas. It made science what it is today and made the incredible advances that we have had possible.
By putting your firmware out into the open you give other people the chance to improve upon it. And guess what – that is exactly what happened.
A paranormal wizard
Ever since we first sold the M1K on Kickstarter, way back in 2019, every single one of our gaming mice came with a little greeting card. And inside that greeting card is always a bare PCB. All of these bare PCBs are fully functional, once you solder all the components to it. And after all that time since 2019, only one guy has ever managed it.
His name is Parawizard and the fact that he is the only one to do that in seven years should tell you all you need to know about him.
Apparently, soldering his own M3K PCB was not enough. Parawizard got bored and decided to build a web configuration tool to go with it.
Enter the Zaunkoenfigurator
The result of his work: the Zaunkoenfigurator. Yes, the name is a mouthful. And no, we are not gonna change it.
At the moment, the Zaunkoenfigurator is limited to the M3K and works only in Chromium-based browsers like Chrome, Edge or Brave. Firefox and Safari still seem unconvinced that talking to a mouse is a good idea.
If your M3K was made in the second half of 2025 or later, its firmware already supports the Zaunkoenfigurator. Older units will need a firmware update first.
Once you open zaunkoenig.co/zaunkoenfigurator, click the Connect button. Your browser will ask for permission to access the HID device. Select M3K (it will show as M3K – Paired on subsequent connections), click Connect in the bottom right corner, and grant the requested permissions.
For Linux users: On Linux the browser needs one additional
permission step. Create the file
/etc/udev/rules.d/71-zaunkoenig-webhid.rules with the
following content:
# Zaunkoenig M3K
KERNEL=="hidraw*", \
SUBSYSTEM=="hidraw", \
ATTRS{idVendor}=="0483", \
ATTRS{idProduct}=="a462", \
MODE="0666"

# Zaunkoenig DFU
ACTION!="remove", \
SUBSYSTEM=="usb", \
ATTRS{idVendor}=="0483", \
ATTRS{idProduct}=="df11", \
MODE="0666"
Then run:
sudo udevadm control --reload-rules && sudo udevadm triggerAfter that, unplug your M3K and plug it back in. The Zaunkoenfigurator should now be able to connect seamlessly.
Once connected, you will see the main interface with your model and firmware version at the top. Below that you can adjust the following six parameters:
- USB speed
- Polling rate
- Lift-off distance
- Angle snapping
- Primary button
- Sensitivity
Here is what it looks like:
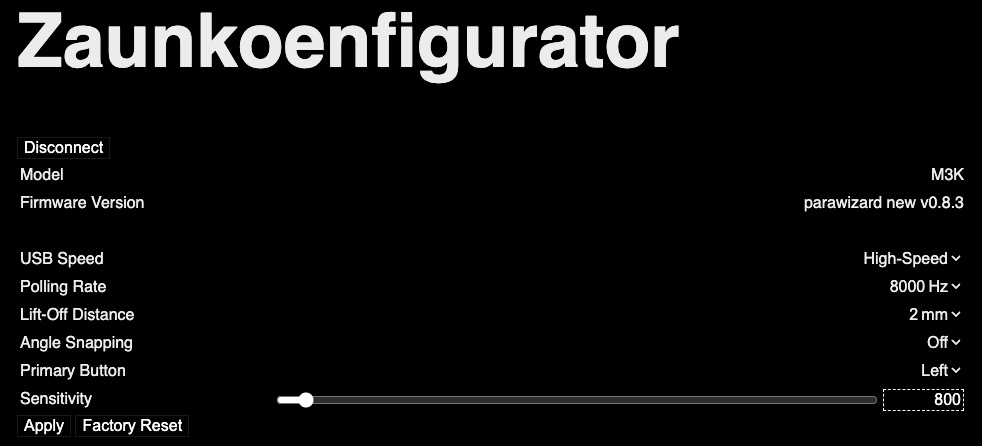
Settings are applied by clicking the «Apply» button. Clicking Factory Reset restores the following defaults: USB High-speed, 8,000 hertz polling rate, 2 mm lift-off distance (LOD), disabled angle snapping, and 800 CPI.
Here is a quick rundown of the six adjustable settings:
USB speed
You can switch between USB Full-speed (12 Mbps) and USB High-speed (480 Mbps). The difference between those two is that the highest driverless polling rate you can achieve with USB Full-speed is 1,000 hertz. With USB High-speed, however, the highest possible polling rate is 8,000 hertz. You can use your M3K at USB High-speed and then use a polling rate of just 1,000 hertz. This has the advantage that your clicks will be processed at 8,000 hertz, but your cursor stays at 1,000 hertz, which can improve the FPS you get in-game.
Polling rate
Controls how many times per second your mouse cursor updates. USB Full-speed only offers you 1,000 hertz, whereas USB High-speed gives you 1,000 as well as 2,000, 4,000 and 8,000 hertz.
Lift-off distance
Lift-off distance sets how quickly the sensor stops tracking when you lift the M3K. Available settings: 1 mm, 2 mm and 3 mm.
Angle snapping
Angle snapping smooths out slightly crooked movements into perfectly straight lines. It will turn perfect circles into rounded squares as well, though.
Primary button
Create a left-handed version of your M3K by swapping the primary button in hardware. Meaning: pressing the physical left mouse button will trigger a right click (unless you are entering nuclear launch codes; in this case nothing is swapped).
You might wonder why this setting even exists: games like League of Legends or Valorant ignore it if you swap your primary mouse button in the Windows control panel; and relying on third-party remapping software could trigger anti-cheat software.
Sensitivity
Sensitivity is measured in counts per inch (CPI). This is the setting that cranky general wanted to change. Doubling your CPI, for example, means that for the same physical movement of your M3K your cursor will move twice as many pixels on your screen. With the M3K and its PixArt 3399 sensor you can use 50 as the lowest and 20,000 as the highest CPI value; and every step in between, in increments of 50 CPI.
To adjust the CPI using the Zaunkoenfigurator, you can either use the slider or you can directly put a number into the text field on the right.
The fourth pillar of Zaunkoenig firmware
I think you will agree that changing settings with the Zaunkoenfigurator is quite a bit more convenient than changing settings with just the nuclear launch codes. I guess that makes convenience the fourth pillar of Zaunkoenig firmware. It all started with a cranky general, all those years ago. And it ended with a crazy wizard.
Rest assured, though: the nuclear launch codes are here to stay. Just imagine surviving the nuclear apocalypse, stranded on a deserted island with nothing but your M3K, a laptop, and a small portable solar panel. No internet, no Zaunkoenfigurator. And suddenly you feel the urge to increase the CPI of your M3K …